

|
This Page will explain how to
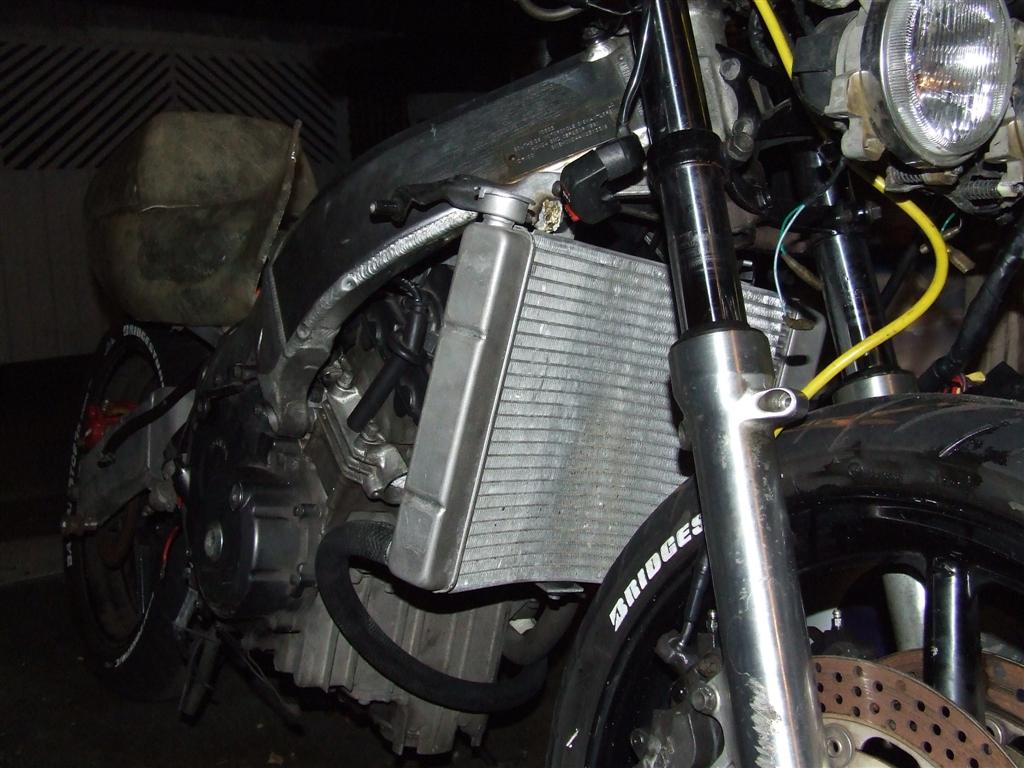
fit an NSR250 oversize radiator onto the CBR 250 with minimal
modifications.
Firstly, the clearance is just enough for full front wheel travel and
exhaust clearance so you needn't worry about it once you get it in
there and think "oh no, it will never fit in there" so now we can
progress to the actual fitment and few modifications that you need.
Primarily the biggest problem is that the NSR radiator has the plumbing
on opposite locations to the stock one. This leads to 2 options, you
can either make a disgustingly long and contorted top radiator hose and
you will need a pipe bender and a lot of hose clamps. Or you can just
flip the thermostat housing upside down so that the top hose goes
across to the opposite side of the bike. This top hose needs a small
extension piece added into it so you can use a 20mm diameter segment of
copper household water pipe or stainless steel if you really want to
[the SS is more expensive though] about 2 - 2 1/2 inches long. You have
to flare the ends out so that the hose clamps can hold onto it properly
also. You will also need to cut a short segment out of the top hose to
make the angle required to fit onto the top pipe of the radiator
itself. I cannot really make a clear call on exactly where to cut it as
you will have to see what i mean when you get around to it. its only
about an inch or so and its on a small angle also. As for the bottom
hose, i was originally going to make some clean bends with my pipe
bender and use straight hose segments inbetween but i found that a
reinforced heater hose off a car [20mm inner diameter also] cut to the
right length routed behind the headers reaches with minimal flattening.
You will also need to make a small hose retainer to bolt onto where one
of the crank case bolts goes to keep the hose from moving about too
much behind the headers.
Next comes the mounting points. You can rather easily use the stock
CBR250 top radiator mounts but need to modify the brake side one a
little. You really need to be able to weld or be able to have access to
a mate that can weld for this part. First things first, you need to
grind off the stone guard mounts on the top of the radiator so that you
can fit your mounts in when its all fabricated. Make sure not to damage
the steel rivets that hold the mounts onto the radiator's top rail. You
need to grind the welds off the post that normally holds the stock
radiator inside the rubber grommets, then press it out and weld in a
small length of 12mm solid stock the opposite way to face inwards
towards the centreline of the bike. It needs to be about 1 - 1 1/2
inches long and make sure that the stock you use fits snugly inside the
rubber grommet on the radiator with no play at all. As for the clutch
side mount. it needs no physical modification whatsoever. Instead, you
merely take out the washer with the post on it, fit it inside the
opposite side of the rubber grommet, get a longer bolt and 5mm worth of
washers and bolt it in from the inside edge of the radiator. If the
bolt is too long you can always grind the excess off later and clean
the thread up. Again, make sure that its all bolted up nice and tight
so there is no play in it at all.
The lower mount is very very simple. the stock MC22 radiator uses a
giant spring pin to retain it in place with a small steel bracket
bolted onto the cylinder head with a very short 10mm head bolt. This
will need to be removed. I haven't got the measurements [as it was all
done on the fly] yet, but its basically a length of aluminium plate 4mm
thick, 40mm wide and about 100mm long. Again those are rough estimates
and i will get the final measurements later. 2 bends need to be made
which can be made easily if you have a vise, a hammer and a block of
wood. A small top hole and a larger bottom hole must be made so that
you can bolt the bracket onto the head and fit a correctly sized
grommet for the lower pin on the radiator. Nothing fancy. Like my
Sergeant used to say. Keep it simple stupid...
After this, you then need to lengthen the sender wire for the
temperature gauge on the dash a little and also make the recirculatory
hose from the thermostat housing to the water pump a bit longer also.
Then that is about it. You now have almost twice the cooling area of
the stock radiator which will allow you to run the bike in the top end
of the revs all day without getting it hot as hell like the old stock
one used to...
Thats about it. Several things to keep in mind here though. This
involved eliminating the radiator fan so don't do this if you like to
sit in traffic a lot. I cannot be held responsible for any blown head
gaskets or warped heads from you doing this then blowing a motor. I am
still on the lookout for a small fan that will fit onto this radiator
somehow but the biggest dillemma is that there is no thermo switch on
the radiator itself so i will also need to come up with a triggering
system for it also. Also, you have to make sure that the radiator lower
mount does not touch the headers at all. This would be a very very bad
thing. Also, for the love of your bike. DO NOT BE ROUGH WITH THESE
RADIATORS!!!! They are like cheese. The slightest amount of force will
bend them in places they should never bend. NO IMPACT ANYWHERE ON THEM
EITHER!!!!...
|
|


